- Log in to your authorize.net account
- Click Account from the main toolbar
- Click Settings in the main left-side menu
- Click API Credentials & Keys
- Select New Signature Key
- Click Submit to continue
- Request and enter PIN for verification
- Your new Signature Key is generated
- Copy the key to clipboard

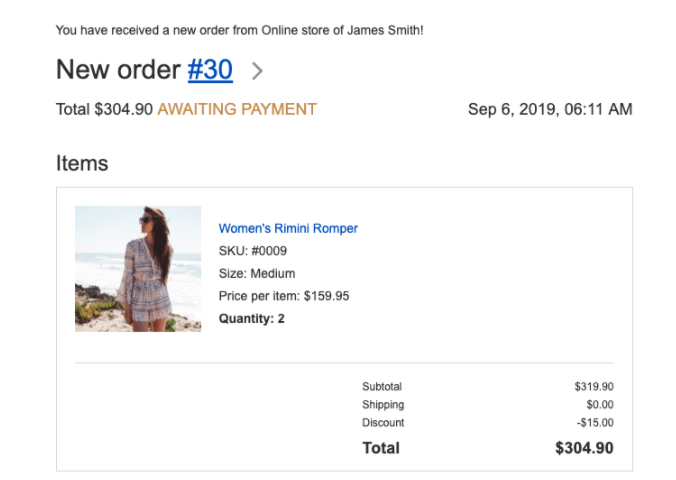
- Your customer selected an offline payment and you need to contact them to arrange payment.
- Your customer’s online payment was not processed. In this case, you can contact the third-party payment provider who processed the transaction or reach out to our support team.
- A customer changed their mind and decided to buy some other product, like of different color or size.
- A customer made a mistake in the delivery address.
- You want to change the tax or shipping cost.
- Add items in the order and delete existing ones
- Change SKU and name
- Change the price
- Change quantity
- Edit name
- Change address
- Change email
- Add and delete discounts
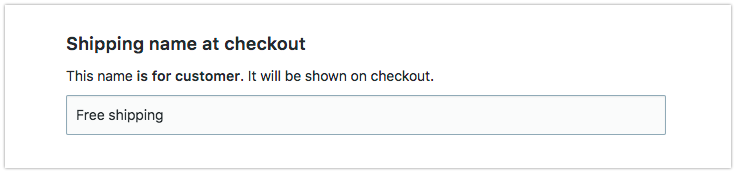
- Edit the names of payment options
- Edit the names of shipping methods
- Change taxes
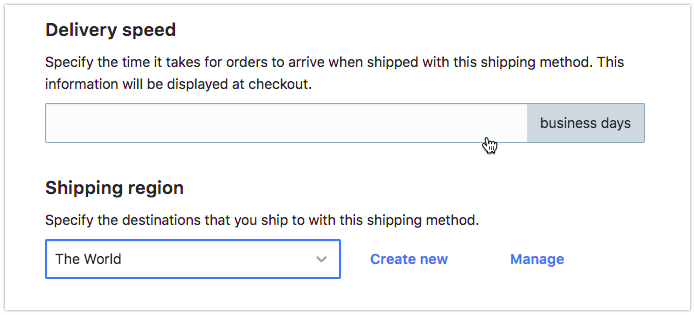
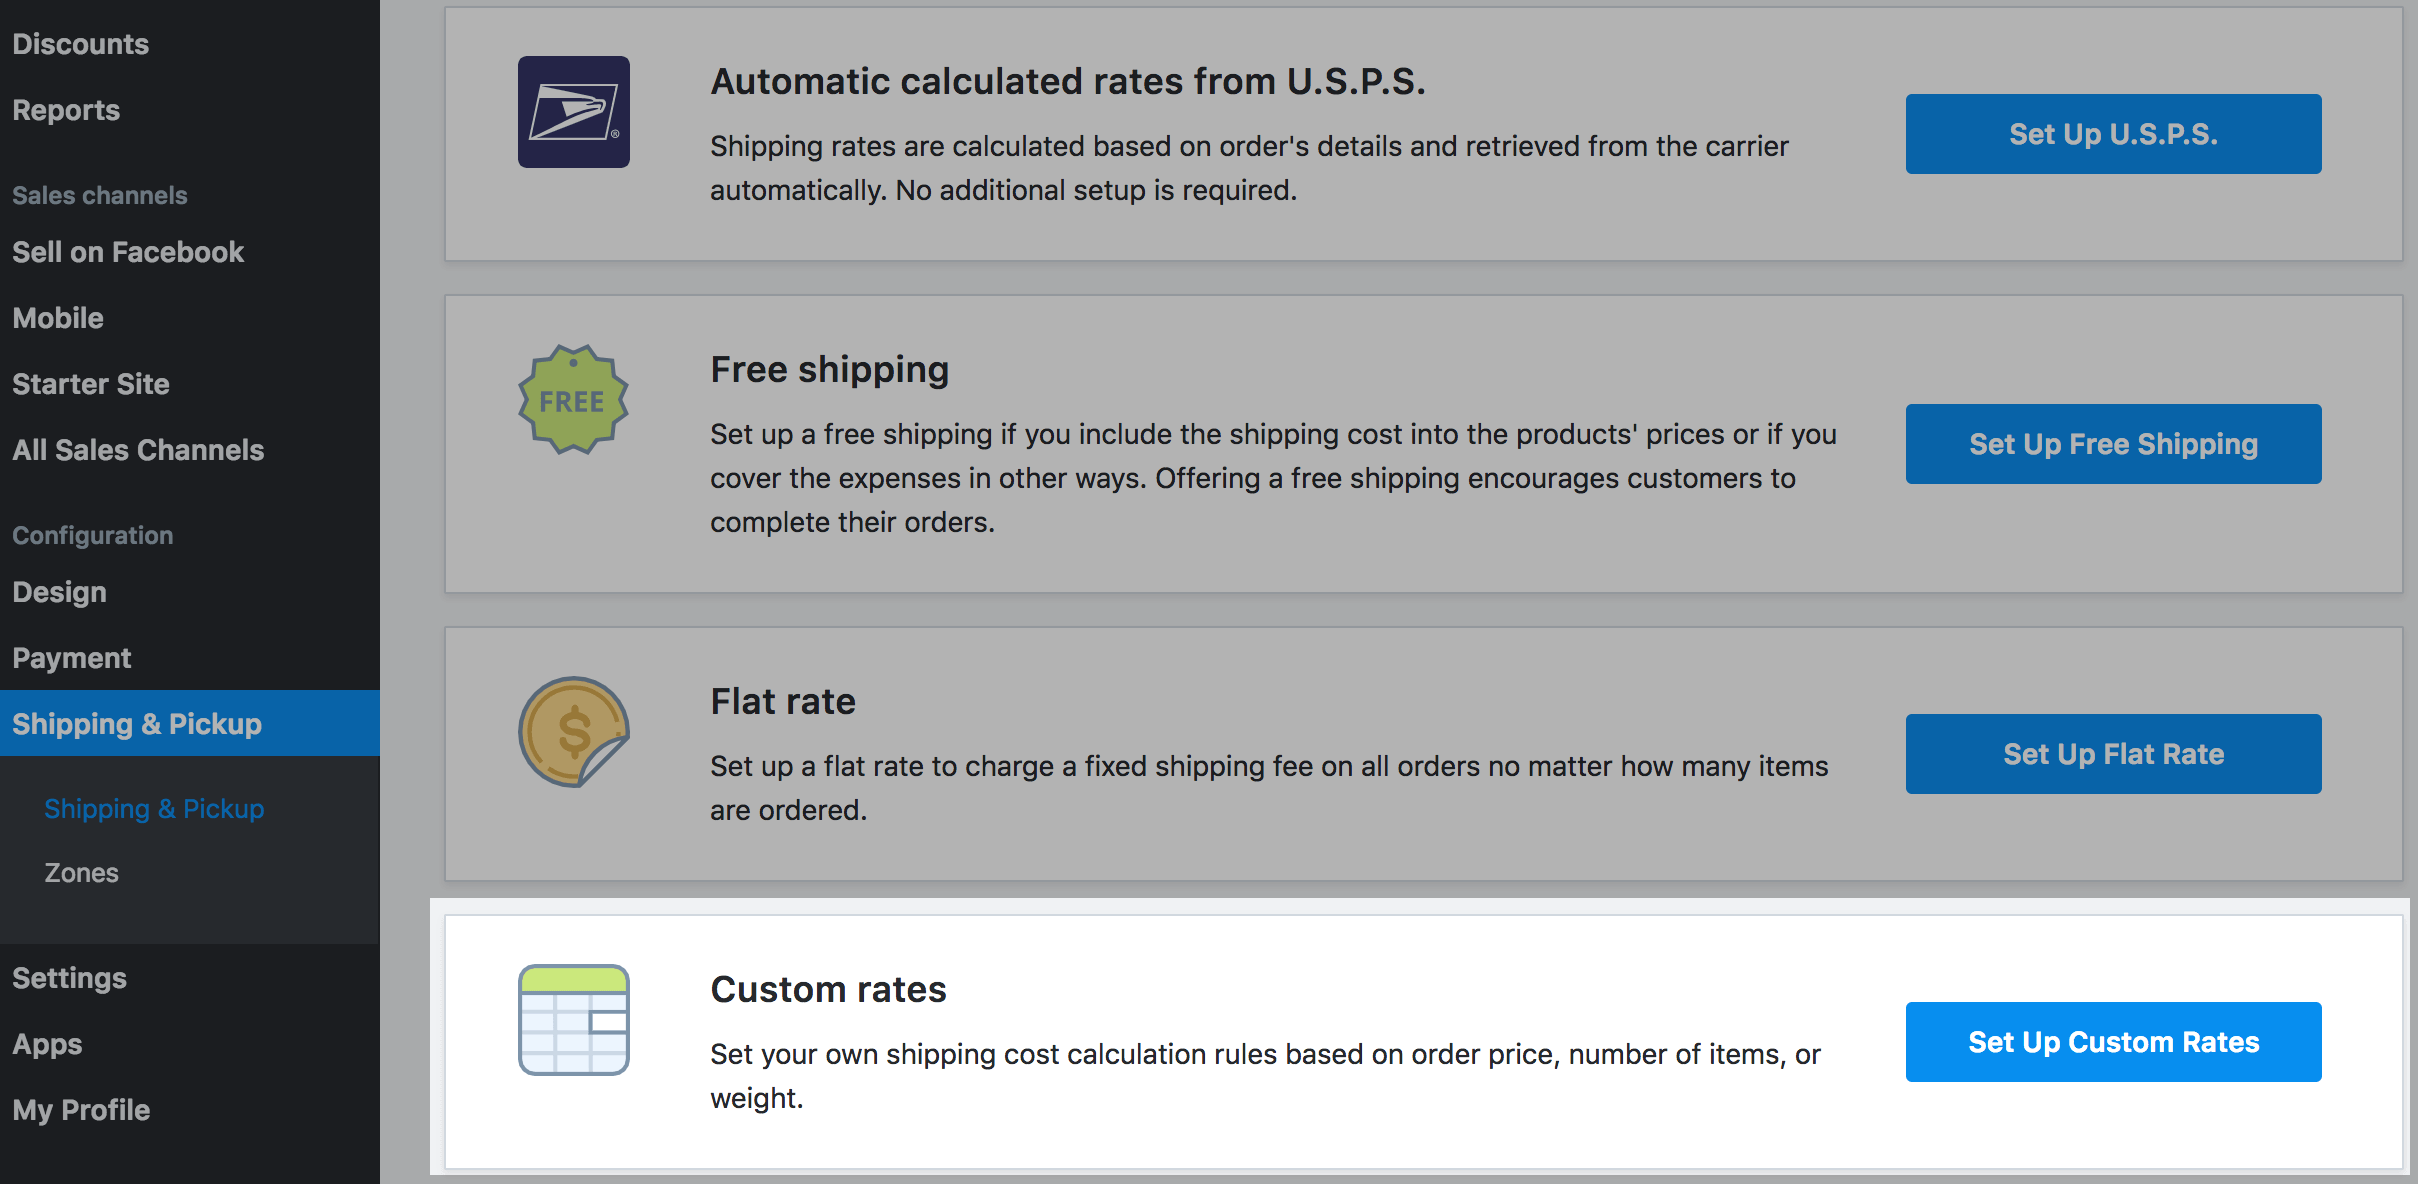
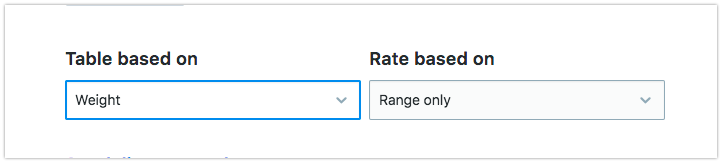
- Change shipping costs
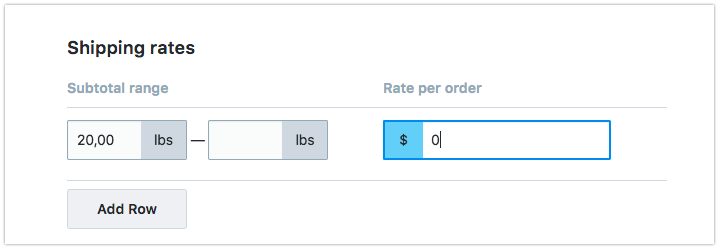
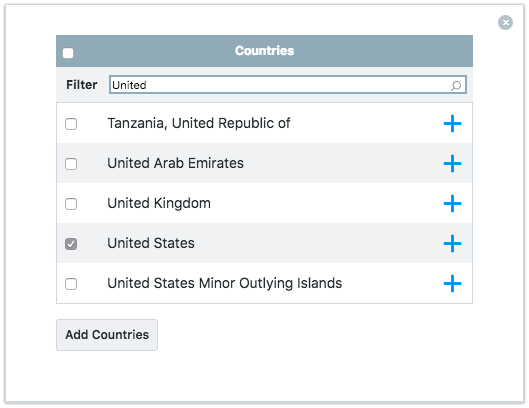 Add By State
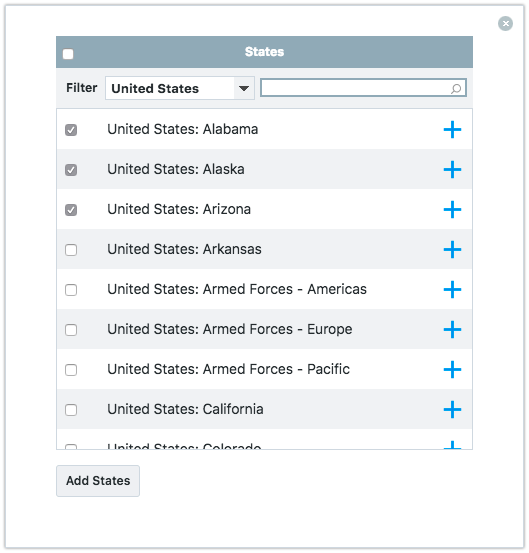
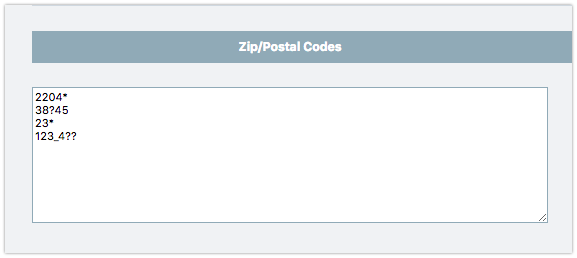
- “?” matches any single character.
- “*” matches any number of characters, including zero. Spaces will be ignored.
- “_” matches any number of spaces (at least one).
Select the specific shipping method for the carrier selected. Select Account details to go to the next section.


- Your business has a published Facebook page, and your Facebook account carries an admin role on it. Learn how to create a page in Facebook’s Help Center.
- Your products comply with Facebook Commerce policies and Guidelines for listing products.
- Your store’s default currency is supported by Facebook. You can change your store’s currency anytime from your store admin in Settings → General → Regional Settings → Currency.
- Products require shipping (so it can’t be a digital product) and can’t be free.
After confirming these steps, connect your store to Facebook.

- From your store admin account, go to “Ominchannel“, then “Sell on Facebook“.
- You will need to provide the account credentials and login via the next screen.
- Select the Facebook business page where you wish to sell your products and click Save.
- Accept Facebook Merchant Commerce Terms.
- In the app, go to Store and click Facebook Shop under Sales Channels.
- Click Connect Facebook page.
- Select the Facebook business page where you wish to sell your products and click Save.
- Accept Facebook Merchant Commerce Terms.
- In the app, go to Store and click Facebook Shop under Sales Channels.
- Click Connect Facebook page.
- Select the Facebook business page where you wish to sell your products and click Save.
- Accept Facebook Merchant Commerce Terms.
Your store will then sync all enabled products to a new Facebook Shop Tab. Once products are uploaded, you need to wait for Facebook to review your store before you can start selling and advertising. Check out the review status under the Pending review tab. Although you might see your products appear on the Shop section before Facebook has verified your information, customers will not be able to see your products until the setup process is complete.
- Products marked as “enabled” in your store will automatically show up in your Facebook Shop page.
- Products marked as “enabled” that are assigned to a disabled category will not be sent to your Facebook Shop.
- Products marked as “disabled” will not be sent to Facebook.
- Products marked as “enabled” that are featured on the Store Front page will be uploaded to the Featured products section on Facebook.

- Products on Facebook Shop are organized into collections, which are similar to your store categories. Collections are top-level only. Products from your sub/child categories will be grouped under the top-level collection in your Facebook Shop.
- A collection is automatically created for each of your top-level categories when you connect your store.
- New custom collections cannot be created, and existing collections cannot be edited on Facebook.
- To hide/show a collection or sort the products within it, enable/disable the store category or sort the products within the category.
You can use the catalog from your Facebook Shop to set up targeted ads within Facebook. Refer to Facebook Ads for more information and setup instructions.To deactivate a product in a Facebook catalog:
- Go to Facebook Catalogue Manager.
- Select your catalog.
- In the menu on the left, click Products.
- Tick products you want to hide from your catalog on Facebook and click Deactivate Delivery:
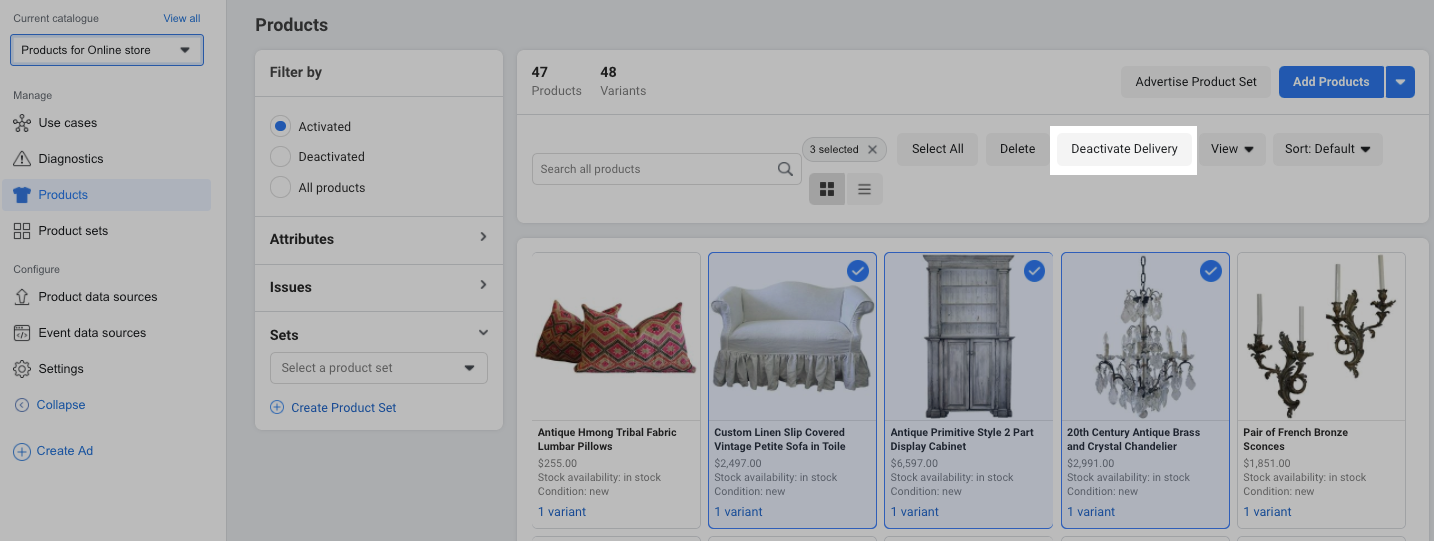
- Review the list of selected items and click Deactivate Delivery to confirm the action.
To hide the Shop tab on your Facebook business page:
- Go to Settings → Templates and Tabs.
- Click Settings next to the Shop tab.
- Switch off the toggle:

- From your store admin, go to Facebook.
- Click on the Status drop-down and choose Disconnect.
- From the app, go to Store → Facebook Shop.
- Click on the Status drop-down and choose Disconnect.
- From the app, go to Store → Facebook Shop.
- Click on the Status drop-down and choose Disconnect.
- On your Facebook business page.
- Go to Settings → Edit page located at the top right corner.
- Drag-and-drop the Shop tab where you prefer on the list of other tabs.

- Show the information about payment options in your storefront. For example, you can add the logos of the credit cards you accept to the description of your store front page or add it to your site footer using CSS.
- Optimize your catalog. Google Shopping campaigns use your product feed to generate ads — they borrow images and pieces of descriptions from your catalog. For your ads to be a success, you can:
- Categorize products wisely in your store so that they sit in the right categories and subcategories;
- Optimize your product titles and descriptions for relevance by including high-value keywords into them;
- Use product images of high quality and free of watermarks in your store (it’s better if they are on white background).
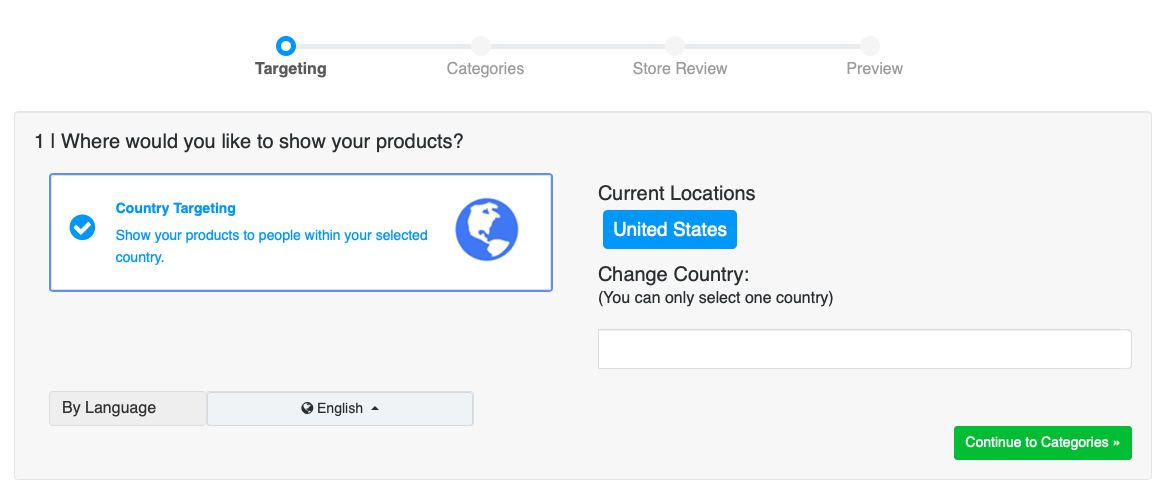
- Log into your DCC account, and select the E-Commerce tile.
- Click on the OMINICHANNEL tab, then select SELL ON GOOGLE.
- Click Continue to Categories. Pick the right Google category for your store to make sure your ad shows up in the right search results and select the condition of your products (New, Refurbished or Used). Example:
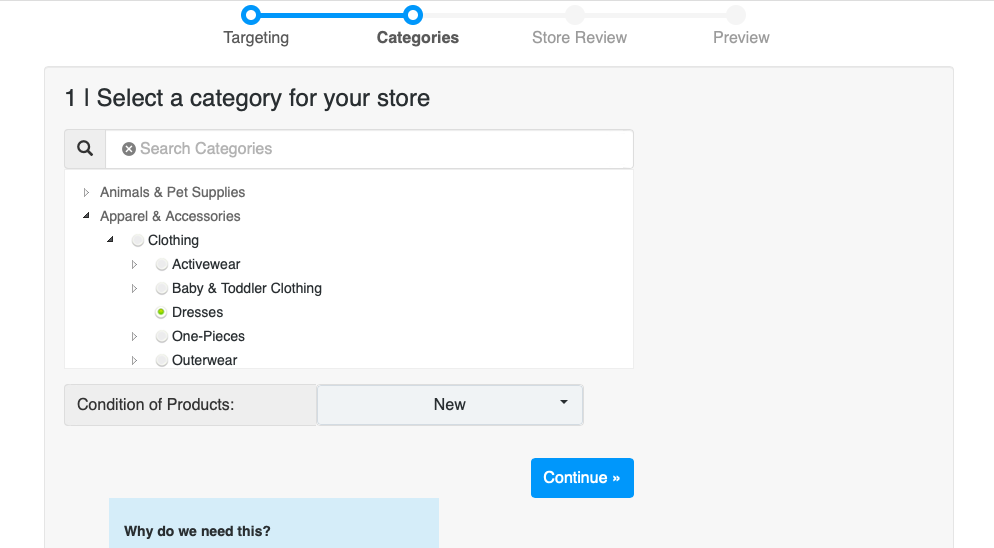
- Click Continue.
- Choose what products you want to advertise. If you don’t use categories in your store, all products will be automatically selected for ads. If you want to advertise specific products only, put them in categories in your store first and then select these categories for the campaign:
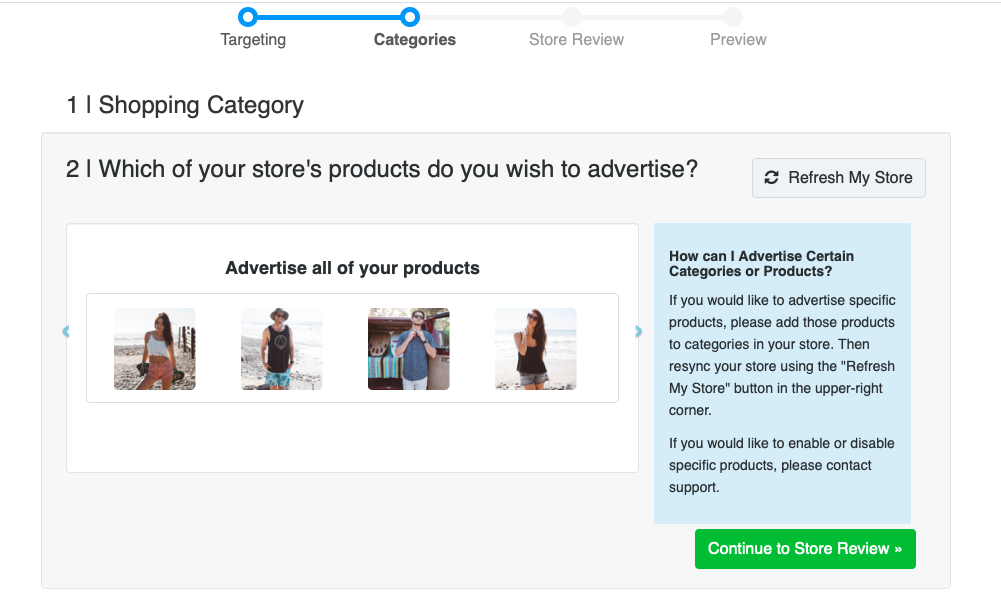
- Click Continue to Store Review.
- If any errors are indicated, click View Details and follow the instructions on how to fix them, then click the I fixed this, Refresh my store button.
- Click Continue to Preview to see how the ads will look like. Example:
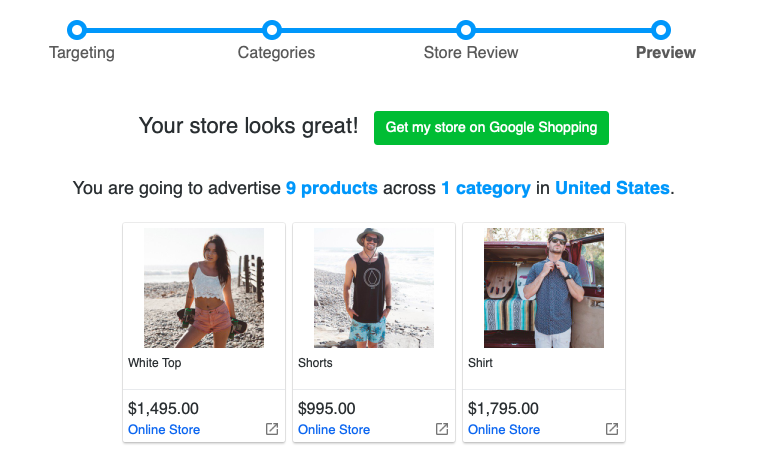
- Click Get my store on Google Shopping.
- Select the preferred package to launch your low-effort Google Shopping campaign.
- That’s it. Your ads have been created.
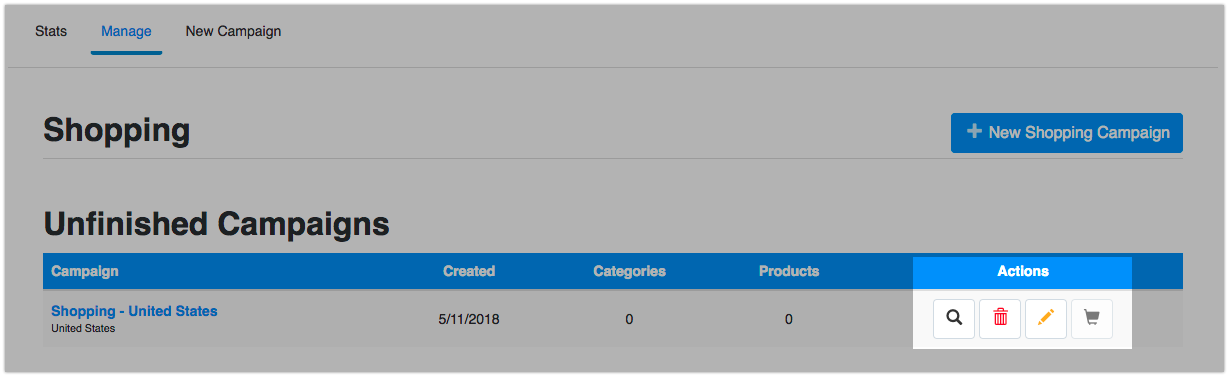 Note: Once you have created your first Google Shopping campaign, you may see a menu at the top of the setup page:
- it does not reflect the true position of your ad,
- each visitor will have a different result,
- it can negatively affect your campaign by generating impressions without clicks (this lowers your click-through rate),
- there are many common reasons why you may not see your ad, even though your stats are accruing.
- checking your Conversion tracking in Adwords account → Tools → Conversions,
- analyzing your Search term reports to ensure your bids are high enough to generate the correct search terms,
- making sure product titles accurately describe your product and search terms are included in the title and description.
- General
- Store Profile
- Format & Units
- Languages
- Cart
- Legal Pages
- Tracking & Analytics
- Destination Zones
- Shipping & Pick Up
- Taxes
- Payment
- Invoices
- Store Name
- Store Location
- Time Zone
- Company Name
- Company Email
- Address
- Address Line 2
- City
- State
- Country
- Phone
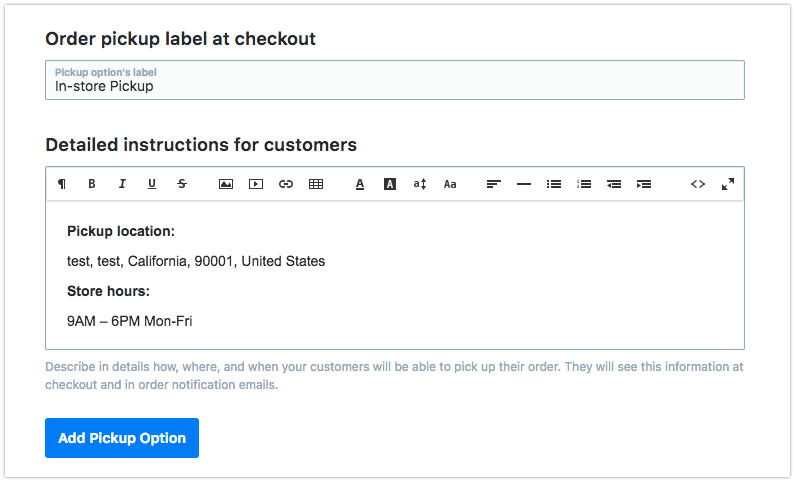
Now when customers choose to pick up their order at checkout, they will be able to select the preferable day and time according to the set business hours and order fulfillment time.
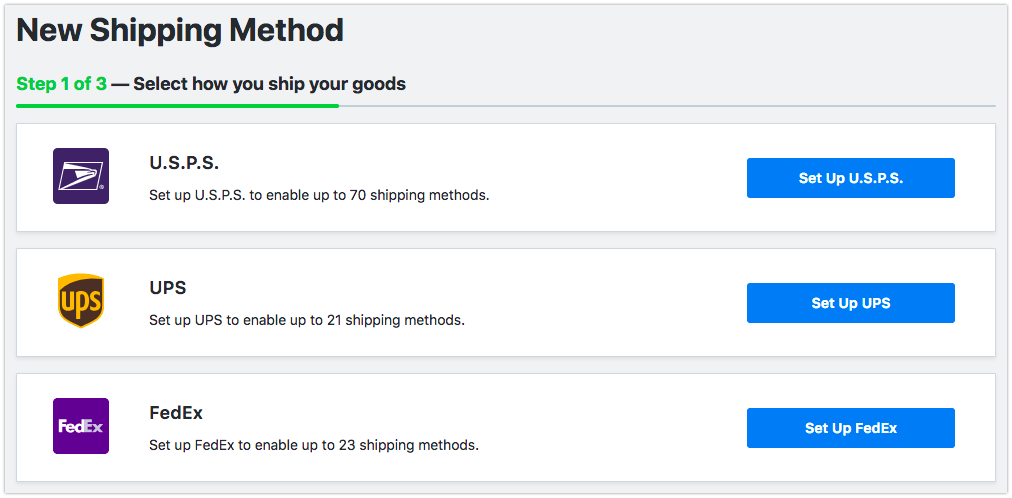
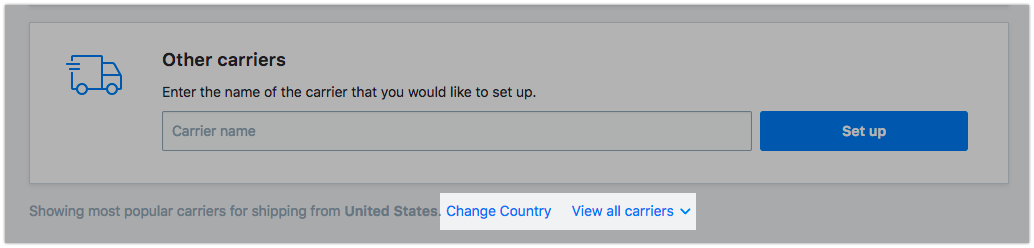
- UPS
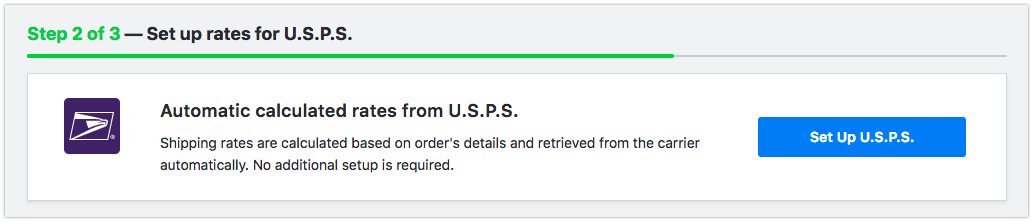
- USPS
- FedEx
- Royal Mail
- Australia Post
- EMS Russian Post
- Canada Post
- Brasil Correios
Pickup Options: Add detailed information on how to pick up a product.
| 2Checkout | PayLeap |
| Afterpay | PayOnline |
| American Express | PayPal Payflow Link |
| ArsenalPay | PayPal Payments Advanced |
| Authipay Payment Gateway | PayPal Payments Pro Hosted |
| Bambora Online Checkout | Paystack |
| Bambora North America (Hosted Payment Form) | PayTM |
| BitPay | PayU Money |
| CC Avenue | PayUbiz |
| Chase Integrated Payments Powered by WePay | PayU Latam |
| Clearpay | PayU Russia |
| Clover | PostFinance Payment |
| CoinPayments | Rave by Flutterwave |
| Datatrans Payment | Razorpay |
| eWAY Rapid | Realex Payments/Global Iris |
| Hesabe | Redsys |
| iDEAL (via Mollie) | Robokassa (Webmoney, Yandex.Money, etc) |
| IntellectMoney | SafexPay |
| Instamojo | Sagepay |
| iPay88 | Sberbank |
| iPay88 Philippines | Sepa |
| iPayment | Tinkoff Payments |
| Lemon Way | Tpay.com |
| Mercado Pago | Virtual Cart Services |
| Mollie | WalletOne |
| Moneris eSELECTplus (Hosted Paypage) | Worldpay Business Gateway |
| MultiSafepay (iDEAL, credit cards, Giropay, DIRECTebanking, etc) | Worldpay Online Payments |
| Network Merchants | Yandex.Kassa |
| Zapper |
- Account creation and verification takes minutes. You don’t have to visit a bank to open a merchant bank account, so you can start taking payments via Square right away.
- No hidden fees. You pay only when you make a sale.
- Payments are secure out of the box. Square is PCI Level 1 compliant and all card-present payments are encrypted from end to end.
- The Square fraud prevention team watches over your account security 24/7 using live monitoring programs and will notify you if they suspect something unusual. You can also enhance the security of your Square account by enabling 2-factor authentication, account change notifications, and adding employees with limited permissions.
- Easy management of payment disputes. As with any transaction, there is always a risk that a buyer will dispute the purchase. You can send to Square team necessary information regarding a payment in question via your Disputes Dashboard and they will fight the dispute on your behalf. Square offers a free Chargeback Protection for all sellers which covers chargebacks that are $250 or less (up to a total of $250 a month).
- PayPal Credit
- Venmo (for the USA)
- iDEAL (for the Netherlands)
- Bancontact (for Belgium)
- MyBank (for Italy)
- Giropay and SEPA Direct Debit (for Germany)
- EPS (for Australia).
- Sign up for PayPal Payflow.
- Log in to PayPal Manager account.
- Select the Service Settings tab.
- Select Set Up.
- At the bottom of the page, under Security Options, set Enable Secure Token to Yes.
- Click Save Changes.
- DO NOT change any other values on this page or on the Customize page. We will pass these values on your behalf automatically.
- From your E-Commerce tile, go to Settings > Payment.
- Scroll down to Other ways to get paid:
- Sign up for PayPal Advanced.
- Log in to PayPal Manager account.
- Select the Service Settings tab.
- Select Set Up.
- At the bottom of the page, under Security Options, set Enable Secure Token to Yes.
- Click Save Changes.
- DO NOT change any other values on this page or on the Customize page. We will pass these values on your behalf automatically.
- From your E-Commerce tile, go to Settings > Payment.
- Scroll down to Other ways to get paid:
- Sign up for a PayPal Payments Pro account.
- From your E-Commerce tile, go to Settings > Payment.
- Scroll down to Other ways to get paid.
- Enter the amount you want to withdraw.
- Select the bank account to receive the money.
- PayPal transfers the amount from your PayPal balance to your bank account.
- Log in to your PayPal account.
- Enter the amount you want to withdraw.
- Cards that you can use for this withdrawal are shown in the To drop-down.
- Select the card to receive the money.
- PayPal transfers the amount from your PayPal balance to the account associated with the card.
- Log in to your PayPal account.
- Click Transfer Money under your balance
- Select Request a check by mail instead.
- Create another PayPal account for testing purposes using an email that is not connected to your seller PayPal account.
- Create a cheap test product ($1 or less) in your store.
- Use the test account to make a purchase in your store, specifying PayPal as the payment method.
- If needed, you may create a chargeback when the payment is received.
- An eCheck that has not cleared is the most frequent cause of a pending payment. This often resolves itself when the eCheck clears (usually 3-5 days).
- The customer did not provide a confirmed shipping address and your Payment Receiving Preferences require you to manually accept or deny these payments. To change this preference, go to the Preferences section of your Profile in PayPal.
- The payment is pending because you hold a non-U.S. account and do not have a withdrawal mechanism. You must manually accept or deny this payment from Account Overview in your PayPal account.
- You do not have a balance in the currency sent, and you do not have your Payment Receiving Preferences set to automatically convert and accept such payments. You must manually accept or deny this payment.
- The payment is pending while PayPal reviews it for risk.
- The payment is pending because you must upgrade your account with PayPal. The Business or Premier plans allow you to accept credit cards and increase the monthly limit for transactions on your account.
- The payment is pending because you have not been verified yet. After verifying, you will be able to accept this payment.
- If PayPal returns the funds, we suggest contacting the buyer and explaining the situation. Creating an invoice in your PayPal account for the same amount and asking your customer to pay it may be the easiest option.
- Register a PayPal account for the wrong email, and verify it. After that, PayPal will transfer the money to the account with the “wrong email” and you can forward the funds to your main business account.
- Live charges: Indicates whether your store is ready to accept payments from buyers through Stripe.
- Supported currencies: Shows what currencies your Stripe account can accept.
- Automatic transfer: Indicates whether the payouts for payment received through Stripe are sent to your bank account automatically. Check Stripe’s FAQs for more detailed information.
- Item not received: a customer claims they didn’t receive the product they ordered and paid for.
- Item significantly not as described: the customer says the item they received is considerably different than what they expected based on the description. For example, they ordered a black mug but received a blue plate.
- Unauthorized transactions: a customer claims that the purchase was made without their consent or permission or they were charged twice for the same item. Be careful when you see this reason as this can be a mistake as well as the actual fraud. Contact your payment processor immediately.
- the date and time when you fulfilled the order;
- the billing information the customer provided;
- the IP address and country used for the order;
- email messages or any other communication you had with the customer;
- shipping and tracking information for the order (if the product or service was digital, an activity log that shows that the customer accessed the product or service);
- descriptions and pictures of the products from your store that prove that they were as described.
Square: How to dispute the chargeback
PayPal: Resolving disputes, claims, and chargebacks
Stripe: Responding to a dispute
Chase Integrated Payments Powered by WePay: How do I challenge the chargeback?
- Closely review and investigate high-value or suspicious orders before fulfilling them.
- Respond quickly to customers’ inquiries, especially if they are about payment processing and shipping.
- Make sure you set reasonable expectations for your customers regarding when they can expect the delivery. Provide a shipment tracking number if possible.
- Keep your customers updated on the order processing. Make sure you send tracking information for orders that need to be shipped.
- Add your contact information (including phone number and address) to your site and store and make sure it is easy to find.
- Add your store policy (including your return policy) to your site and make it easy to find.
Accepting Orders Online
Scroll to the bottom of the page and select “Choose Payment Processor”.
- A shopper is ready to make a purchase, goes to checkout at your store, and chooses an online payment method.
- We send information about the shopper’s order to the respective payment processor.
- Depending on how your store is integrated with a payment processor that stands behind the chosen payment method:
- Shopper enters payment information on the website of the payment processor and confirms the payment;
- Shopper enters payment information right in your store’s checkout and confirms the payment
- Payment processor requests payment from the card’s issuing bank. If the card is valid and the account has sufficient funds, the card’s issuing bank authorizes the transaction and releases funds to the payment processor (if there is an issue, the card’s issuing bank declines the transaction).
- After the shopper gets charged, the payment is transferred to your merchant account with the payment processor.
- The payment processor automatically sends the information about a successful transaction to us and we set the order status as Paid (if the transaction was declined, the payment processor informs us about it and we set the order status as Canceled).
Offline Payment Methods
Accepting Orders in Person
- Accept cash payments
- Swipe credit cards using PayPal Here or Square card reader on your mobile device
- The orders taken with the help of the Sell On The Go app will automatically appear in your
- E-Commerce tile and the inventory will be synced with your online store.
How Customers Pay in Your Store
When to Ship an Order
You can receive push notifications about new orders as well as check and update order statuses on the go if you use the mobile app. Please see the Mobile tab to download the app to your phone.
- Your customer selected an offline payment method and you need to contact them to arrange payment.
- Your customer’s online payment was not processed. Usually the reason why is shown in the order details. To check, go to your E-Commerce tile > My Sales > Orders page, and select the order to see details. If it’s still unclear what caused the issue, you can contact your payment provider who processed the transaction.
Where’s the money?
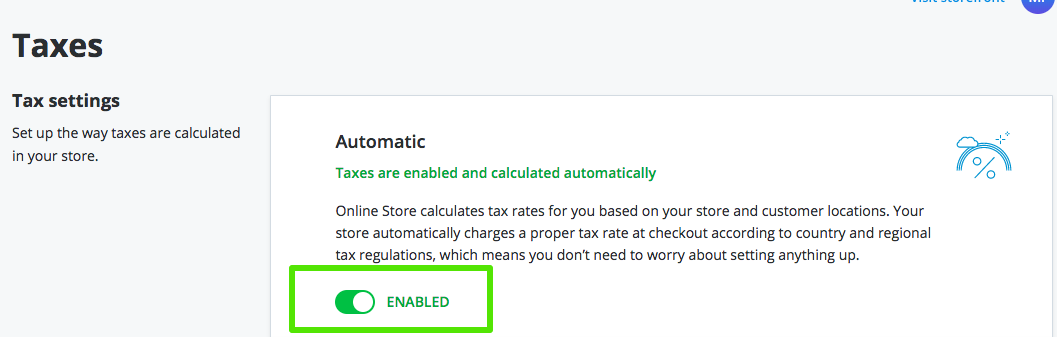
Automatic Tax Calculation
Setting up Automatic Tax Calculation
- Whether you’re located in a region with origin-based or destination-based tax schema
- Whether shipping cost or discounts are taxable
- Whether you should charge tax in another state or country not
Are county taxes calculated automatically? What about zip+4 taxes?
What if some of my products are not taxable?
Setting up Manual Tax
Why isn’t tax calculated if I use PayPal Express Checkout?
I am from the EU. How can I set up my store to comply with EU business regulations?
How do I set up a tax rate for a certain state or city?
Tax Calculation in the US
- Each product image should be of uniform size and style across all products you sell.
- Use high-quality images so customers can see any fine details.
- Avoid long sentences and complex vocabulary: Imagine you are explaining the product to a 10-year-old child.
- Include product demo videos: Just by watching a person hold, touch, and interact with the product while explaining its pros is the next best thing to visiting a store.
- Provide a short and long version of your description: Some people scan rather than read. Some like to read more in-depth about your product. Make sure you cover both types.
Select “+ Add New Value” and add all values of the option. Add as many new values as you need and specify whether they affect the base product price or not.
Choose the Default option (if you tick the “Do not preselect default value” option, the Default column is hidden).
- Drop-down list allows selection of one value from multiple choices. We suggest drop-down lists for a compact view of many choices.
- Radio Buttons allow selecting one value from multiple choices like Sizes.
- Date Picker is a popup calendar to select a date for a product/service.
- Text Field and Text Area are input text fields where your customers can type any text for a product. It is often used to offer personalization, engraving, custom printing, or embroidery for products.
- Checkboxes allow selection of several options at once. For example, pizza toppings.
- Upload file allows customers to attach files to the product or service they order.
- Coupon Name
- Coupon Code
- Type of Discount
- Time of Life
Select the Design tab.