After a customer abandons their cart, you can send a recovery email to remind the shopper about their unfinished order. Recovery emails can be configured to automatically send two hours after failure to checkout.
 
Some customers, like wholesalers and nonprofit organizations, can be exempt from taxes. You can mark such buyers as non-taxable so they can check out in your store without having tax applied to their order. 
 
 
To mark customers as tax exempt, select the E-Commerce tile.


Select My Sales > Store Customers. Select the pencil icon. 


Select Tax exemption enabled and select Save.
Managing customers and communicating with them is crucial for running a business. Every time a new customer places an order in your store, they appear on your customer list.
 
You can see and manage all your customers in your E-Commerce tile > My Sales > Store Customers
We create an account for all customers who place an order in your store. This allows your customers to use the address book, to view their order history, and see the status of their current orders.
The Customers tab displays customer information from all sales.


Customer groups allow you to categorize your customers to offer targeted promotions.
Not every person who adds something to their cart in your online store makes it all the way through the checkout process to complete a purchase.
Each time a potential customer provides their contact information but leaves the checkout, we store that order attempt as an abandoned cart.
You can review the list of abandoned checkouts in your store and follow up with cart recovery emails.


View Abandoned Carts


To view abandoned carts, select the E-Commerce tile.


Abandoned carts are automatically tracked and listed in My Sales > Abandoned Sales


Each incomplete order contains the customer’s contact details provided on checkout and shows which shipping and payment options were chosen, as well as what items were added to the bag.


Send Cart Recovery Emails


You can encourage a customer to complete their orders by sending an email with a link to their abandoned cart so that they can quickly and easily complete their checkout if they choose.

In your E-Commerce tile, go to My Sales > Abandoned Carts, find the order that you want to recover, and click Send email.abandoned-email-cusotmer.png


You will be able to review the email content and edit the message to say exactly what you would like. Select Settings > Email Notifications, scroll down to the customer marketing email section and select edit for the Abandoned Cart Recovery email.


You will be able to customize the email to your preference. 


Send Cart Recovery Emails Automatically


After an abandoned cart occurs, we can send a recovery email to remind the shopper about their unfinished order. Recovery emails configured to be sent automatically are more effective in capturing lost sales.
To enable automatic recovery emails, go to your E-Commerce tile > My Sales > Abandoned Carts and change the toggle to Enabled.


We’ll send a recovery email for each abandoned cart 2 hours after the order was listed in your dashboard. When the email is sent, it will be noted in the details of the incomplete order.
When you need to generate a sales report, create a report of collected sales taxes, or simply get a list of orders with their details, you can use the export tool in your store. The exported order data will be saved on your computer as a CSV file. You can open the CSV file in any text editor or in a spreadsheet and arrange data.
 
To export orders from your store, select the E-Commerce tile.


Select My Sales > Orders. Scroll down and select the Export All button. 
 
Select the order data you want to see in the downloaded file. You can use the ready filters in the top right corner (All, All but item details, None) or pick the data for export manually. Select Download CSV file.
 
Open the downloaded file with a spreadsheet editor. Programs like Microsoft Excel must be purchased. OpenOffice and Google Sheets are free and do not corrupt CSV files.
 
Understanding the ordering process is essential for running your business. New orders appear on the orders list in your E-Commerce tile > My Sales > Orders. You can also edit orders or create them manually.
 
To view orders, select the E-Commerce tile.


How Customers Place Orders


After customers visit your store, add products to their cart, and proceed to checkout, they see payment options you have enabled. Your customers will select the payment option they prefer and proceed.
 
If your products require shipping, the customer must select a shipping option and enter their address before their order is complete.
 
TipsWe recommend placing a test order to check the customer experience and make sure everything works as expected. Creating a test order (e.g., a fake product that costs $1) and following all the steps for a purchase through completion will help you understand the ordering process from your customers’ point of view.
 
We save a customer’s cart to their browser for 30 days. Should the customer return to your site, they can continue the checkout process for the same order.


Getting a New Order


My Sales > Orders displays new orders as soon as your customer clicks “Place Order”. Orders paid for online usually show a Paid status while offline payment methods are normally accompanied by Awaiting payment.
 
To receive email notifications for new orders, enable the New Order Placed notification


Getting Paid


We don’t collect or hold any revenue from your store. Our software simply provides a platform for you to sell products to your customers. The payment options you select determine how you receive payment.
 
For online payments, transactions are processed via third-party providers such as PayPal and Stripe. The funds are deposited to your account with the payment provider and you can withdraw these funds using the methods outlined by the payment provider.
 
For offline (manual) payments such as phone order, bank transfer, or cash on delivery, you must contact the customer to arrange payment.


When to Ship an Order


You will receive an email notification that shows the order status with each new order. You can also check the order status in your store My Sales > Orders.
 
A Paid orders status means your customer selected an online payment option and the third-party provider processed the payment. Prepare this order for shipping and ship it right away!
 
An Awaiting Payment order status can mean one of two things:
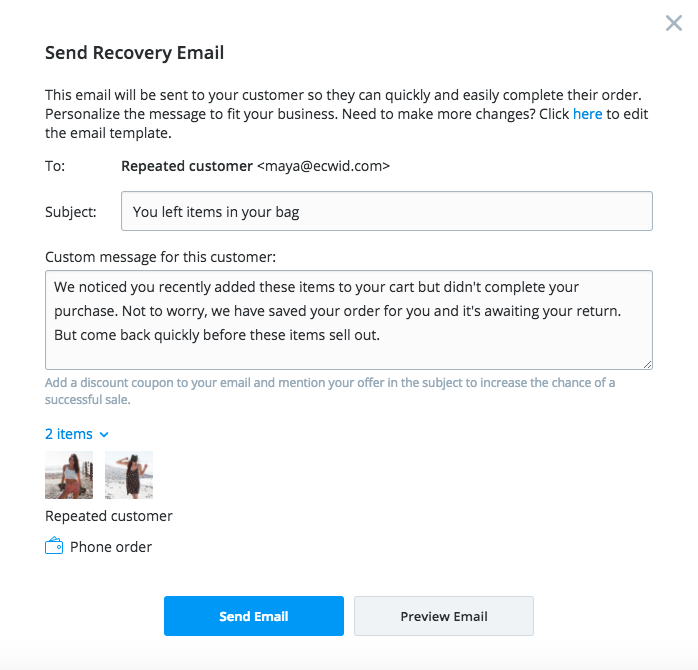
  • Your customer selected an offline payment and you need to contact them to arrange payment.
  • Your customer’s online payment was not processed. In this case, you can contact the third-party payment provider who processed the transaction or reach out to our support team.
Sometimes you need to update the information in your orders, for example:
  1. A customer changed their mind and decided to buy some other product, like of different color or size.
  2. A customer made a mistake in the delivery address.
  3. You want to change the tax or shipping cost.


Order Information You Can Edit


In your store you can edit your orders and change lots of things.
 
About products ordered:
  1. Add items in the order and delete existing ones
  2. Change SKU and name
  3. Change the price
  4. Change quantity
About the customer:
  1. Edit name
  2. Change address
  3. Change email
  4. Add and delete discounts
About the order itself:
  1. Edit the names of payment options
  2. Edit the names of shipping methods
  3. Change taxes
  4. Change shipping costs


Editing Orders


To edit an order, select the E-Commerce tile.


Select My Sales > Orders tab.


Select the Update Order button and select Edit Order.
 
 
When you have found the order you want to change, click the pencil icon next to the detail you want to edit:


Update the information and click Save changes.


Adding Items to an Order


To add an item, select Add product.


Enter the SKU, name, price, and quantity.
 
 
Click Add product.


Removing Items From an Order


To remove an item, select the pencil icon. Select Remove. This will delete the product from the order.


What if the order total changes after editing?


If the order total changes after editing, we will neither charge your customer for the insufficient amount, nor refund your customer.
 
So if after editing the amount became larger, you need to contact your customer directly and agree upon the way they can transfer the money to you.
 
And if the amount got smaller, you need to return part of the money to your customer via your payment processor. Payment processors always allow making refunds in their backend. Please contact your payment gateway’s customer service if you’re not sure how to do this.
Admin notifications are emails sent to the store owner automatically when a new order is placed and when products get low in stock. The store owner can also receive copies of all email notifications that are sent to customers.
 
You can select what email address you want to use for admin notifications, and you can add your partners’ or staff’s email addresses so they receive admin emails as well. Email notifications are managed in your E-Commerce tile > Settings > Email NotificationsAdmin_notifications__3_.png


Enabling/Disabling Admin Notifications


When you create a new store account, all admin notifications in the store are enabled by default. You can see the full list of admin email notifications in your E-Commerce tile > Settings > Email Notifications, in the “Admin notifications” section. If you discover that you don’t need some of the admin notifications, you can disable them to keep your inbox clean.


Changing an Email Address for Admin Notifications


After you create a new store account, your login email will automatically be set as the email address for admin notifications, however you can choose to have admin notification emails sent to any email address.
To change the email address for store admin notifications, scroll down and select the Change button in the mail settings section.


Update the fields and select Save Changes.
 
 
Customer notifications are email messages that customers automatically receive from your store after they have successfully placed an order, you have changed their order status, the digital files they bought are ready to be downloaded, etc.
 
You can manage customer email notifications in your E-Commerce tile > Settings > Email Notifications. Here you can choose which customer notifications you want to send and which ones you want to disable, set the store name and email address that customers will see when they receive emails from your store, upload a logo, etc. You can also edit email notification templates, add info about new products in your store, alert customers about ongoing sales, and encourage customers to place new orders by sharing discount coupons.
 
 
To manage customer notifications, select the E-Commerce tile.


Select Settings and Email Notifications.


Enabling/Disabling Customer Notifications


By default, all customer email notifications are enabled in the store. You can see and manage these notification options in your Settings > Mail, in the “Customer notifications” section.
You can choose what emails you want to send to customers and disable those you don’t need. For example, if you change order statuses in your dashboard to keep track of order processing for yourself and don’t want customers to see these updates, you can disable “Order status changed” notifications and keep only “Order shipped.”


Changing the “From” Email Address and Store Name


You can specify what email address customers will see as “from” address when they receive notifications from your store. To change the “from” email address and store name for your customer notifications, go to Settings > Email Notifications. Scroll down and select the change button in the Mail Settings section. 


Update the fields and select Save Changes.
You can print shipping labels right in your dashboard. App Market features apps that allow you to print shipping labels and streamline the shipping process.


Printout Designer

Printout Designer allows you to create invoices, packing slips, and shipping labels. You can easily batch print, download, or email all your printouts with a couple of clicks. Once installed, the app will be integrated right in your dashboard so you can customize your invoices and other printouts without leaving your store’s backend.

The app is paid with free trial.


ShipStation

ShipStation combines order processing, production of shipping labels, and customer communication in an easy to use, web-based interface that integrates directly with major carriers and online platforms. Create a ShipStation account and connect it your store. Once you set up your ShipStation account, you will be able to manage shipping labels, packing slips, and invoices in the ShipStation dashboard.


The app is paid with free trial.


The App Market

To access our App Market, select the E-Commerce tile.


Select the App Market tab and search for apps. 
 
To manage pickup orders, select the E-Commerce tile..


Select My Sales > Orders.


To confirm an order is for pickup, you will see the In-store Pickup icon.


To inform the customer that their order is awaiting pickup, simply change its Fulfillment Status to Ready for Pickup. Your store will send the corresponding email notification to the customer’s email address.


When you have shipped an order, you can pass the package tracking number to the customer so that they can check the delivery status. You can mark orders as Shipped and assign the tracking number to it.
 
 
To add a tracking number, select the E-Commerce tile.


Select My Sales > Orders. Select the Update Order button and click Assign Tracking Number.


You have the option to ship with or without a tracking number. The customer will receive an order status update and a tracking number via an email notification.
 
 
Deleting an order will remove any record of it from your store and your order history.
 
​To delete an order, select the E-Commerce tile.


Select the checkbox next to the order you would like to delete. Select Mass Update and select Delete Selected.
You might need to cancel an order if a customer changes their mind about the purchase before they have paid for it.
 
 
To cancel an order, select the E-Commerce tile.


Select My Sales > Orders > Select the dropdown next to paid and select Canceled. 
Once you have canceled the order, the customer will receive a notification about the changed order status in their inbox.
You can give a customer a full or a partial refund for an order.
TipTo actually refund the payment, you will need to log in to the merchant account of the payment processor you use in your store and issue a refund from there.
 
To notify your customer about the refund, select the E-Commerce tile.


Select My Sales > Orders and select a payment option. Select Refunded or Partially Refunded. The customer will receive a notification about the changed order status in their inbox.


NoteIf you mark an order as Refunded, we will automatically restock the purchased items. If you mark an order as Partially refunded, we will not change the stock of the purchased products. In both cases, we will not process an actual payment reversal.
When you sell from your online store, the orders your customers place are automatically recorded in your dashboard. If you sell offline as well, for example, you accept orders by phone or email or have a brick and mortar store, we do not know about those sales, so they are not recorded in your dashboard. In this case, you can create these orders manually and keep track of your sales and inventory. You will have a full order history in your dashboard even for orders that were processed via phone or offline.
 
 
To create an order manually, select the E-Commerce tile. 


Select MySales > Edit Orders. Select the Create Order button.


Fill in the customer information.
Note: If this is a returning customer, all you need to enter is their email. We will populate all other customer information automatically.


Select “Edit” next to the Shipping Method and add the name of the shipping option. In a dropdown, we will show the options that you have in your store.


Add the name of the payment option.


The order is pre-populated with a default product. Select the pencil icon to remove or edit it.


To add more items to the order, select Add Product.


Enter the product SKU and the number of items purchased. We will fill in all other information for you.


Edit the shipping information, taxes, and discounts. Select Save changes.


When you are done with entering the order information, select Place Order.
 
 
You can now find this order in your store My Sales > Orders.
 
The Update Order drop down provides five different options.
  1. View Order
  2. Update Status
  3. Mark as Shipped
  4. Edit Order
  5. Print invoice
 
 
View Order: View an order’s details. 
To view your sales, select the E-Commerce tile.
 
The My Sales section tracks all sales, customer info, and order edits. Below is a sample order.
 
Select Print Invoice to open the invoice in a new window. Printing options will automatically appear.